Run Chainhook as a Service using Stacks
You can run Chainhook as a service to evaluate Stacks blocks against your predicates. You can also dynamically register new predicates by enabling predicates registration API.
Start with the prerequisite section and configure your files to start the chainhook service.
Prerequisite
Configure Stacks Node
- Configure your stacks node using the Stacks node configuration documentation.
- Recommend the latest version of Stacks. You can check the latest version by following this link.
- Set up the bitcoin node by following this article, then get the
rpcuser,rpcpassword, andrpc_portvalues defined in thebitcoin.conffile.
A Stacks.toml file is generated when configuring the stacks node. Below is the sample Stacks.toml file.
[node]
working_dir = "/stacks-blockchain"
rpc_bind = "0.0.0.0:20443"          # Make a note of this port to use in the `Chainhook.toml`
p2p_bind = "0.0.0.0:20444"
bootstrap_node = "02da7a464ac770ae8337a343670778b93410f2f3fef6bea98dd1c3e9224459d36b@seed-0.mainnet.stacks.co:20444,02afeae522aab5f8c99a00ddf75fbcb4a641e052dd48836408d9cf437344b63516@seed-1.mainnet.stacks.co:20444,03652212ea76be0ed4cd83a25c06e57819993029a7b9999f7d63c36340b34a4e62@seed-2.mainnet.stacks.co:20444"

[burnchain]
chain = "bitcoin"
mode = "mainnet"
peer_host = "localhost"
username = "bitcoind_username"       # Must match the rpcuser in the bitcoin.conf
password = "bitcoind_password"       # Must match the rpcpassword in the bitcoin.conf
rpc_port = 8332                      # Must match the rpcport in the bitcoin.conf
peer_port = 8333

[[events_observer]]
endpoint = "localhost:20455"
retry_count = 255
events_keys = ["*"]
[!NOTE] Ensure that the
username,password, andrpc_portvalues in theStacks.tomlfile match the values in thebitcoin.conffile. Also, note therpc_bindport to use in theChainhook.tomlconfiguration in the next section of this article.
Configure Chainhook
In this section, you will configure a chainhook to communicate with the network. Run the following command in your terminal and generate the Chainhook.toml file.
chainhook config generate --testnet
Ensure that the bitcoind_rpc_url, bitcoind_rpc_username, bitcoind_rpc_password match with the rpcport, rpcuser and rpcpassword in the bitcoin.conf file and the port of the stacks_node_rpc_url matches the rpc_bind in the Stacks.toml file.
The following Chainhook.toml file is generated:
[storage]
working_dir = "cache"

# The HTTP API allows you to register/deregister
# dynamically predicates
# Disable by default
#
# [http_api]
# http_port = 20456
# database_uri = "redis://localhost:6379/"

[network]
mode = "mainnet"
bitcoind_rpc_url = "http://localhost:8332"                # Must match with the rpcport in the bitcoin.conf
bitcoind_rpc_username = "<bitcoind_username>"             # Must match with the rpcuser in the bitcoin.conf
bitcoind_rpc_password = "<bitcoind_password>"             # Must match with the rpcpassword in the bitcoin.conf
stacks_node_rpc_url = "http://localhost:20443"            # Must match with the rpc_bind in the Stacks.toml file

[limits]
max_number_of_bitcoin_predicates = 100
max_number_of_concurrent_bitcoin_scans = 100
max_number_of_stacks_predicates = 10
max_number_of_concurrent_stacks_scans = 10
max_number_of_processing_threads = 16
max_number_of_networking_threads = 16
max_caching_memory_size_mb = 32000

[[event_source]]
tsv_file_url = "https://archive.hiro.so/mainnet/stacks-blockchain-api/mainnet-stacks-blockchain-api-latest"
Ensure the following configurations are matched to allow chainhook to communicate with the Stacks and Bitcoin layers.
| bitcoin.conf | Stacks.toml | Chainhook.toml |
|---|---|---|
| rpcuser | username | bitcoind_rpc_username |
| rpcpassword | password | bitcoind_rpc_password |
| rpcport | rpc_port | bitcoind_rpc_url |
| zmqpubhashblock | bitcoind_zmq_url | |
| rpc_bind | stacks_node_rpc_url | |
| endpoint | stacks_events_ingestion_port |
[!NOTE] The
bitcoind_zmq_urlis optional when running chainhook as a service using stacks because stacks will pull the blocks from Stacks and the Bitcoin chain.
Scan blockchain based on predicates
Now that the stacks and chainhook configurations are done, you can scan your blocks by defining your predicates. This section helps you with sample JSON files to scan the blocks in the blockchain and render the results. To understand the supported predicates for Stacks, refer to how to use chainhook with stacks.
The following are the two examples to walk you through file_append and http_post then-that predicate designs.
Example 1 uses a print_event.json file to scan the predicates and render results using file_append.
Example 2 uses print_event.json to scan the predicates and render results using http_post.
You can choose between the following examples to scan the predicates.
Example 1
Run the following command to generate a sample JSON file with predicates in your terminal.
chainhook predicates new print_event_1.json --stacks
A JSON file print_event_1.json is generated.
{
  "chain": "stacks",
  "uuid": "1da35032-e399-430c-bfbc-eca94709ad11",
  "name": "Hello world",
  "version": 1,
  "networks": {
    "testnet": {
      "start_block": 0,
      "end_block": 100,
      "if_this": {
        "scope": "print_event_1",
        "contract_identifier": "ST1SVA0SST0EDT4MFYGWGP6GNSXMMQJDVP1G8QTTC.arkadiko-freddie-v1-1",
        "contains": "vault"
      },
      "then_that": {
        "file_append": {
          "path": "arkadiko.txt"
        }
      }
    },
    "mainnet": {
      "start_block": 0,
      "end_block": 100,
      "if_this": {
        "scope": "print_event_1",
        "contract_identifier": "SP2C2YFP12AJZB4MABJBAJ55XECVS7E4PMMZ89YZR.arkadiko-freddie-v1-1",
        "contains": "vault"
      },
      "then_that": {
        "file_append": {
          "path": "arkadiko.txt"
        }
      }
    }
  }
}
[!NOTE] You can get blockchain height and current block in the Explorer.
The sample arkadiko.txt should look like this:
{"apply":[{"block_identifier":{"hash":"0xf048102fee15dda049e6781c8e9aec1b39b1b9dc68d06fd9b84dced1b80ddd62","index":34307},"metadata":{"bitcoin_anchor_block_identifier":{"hash":"0x000000000000000000098e9ebc30e7c8e32b30ffecbd7dc5c715b5f07e1de25c","index":705648},"confirm_microblock_identifier":{"hash":"0xa65642590e98f54183a0be747a1c01e41d3ba211f6599eff2574d78ed2578468","index":2},"pox_cycle_index":18,"pox_cycle_length":2100,"pox_cycle_position":1797,"stacks_block_hash":"0x77a1aed86e895cb4b7b969986aa6a28eb2465e7227f351dd4e23d28448b222e9"},"parent_block_identifier":{"hash":"0x3117663ee5c5690d76e3f6c97597cbcc95085e7cecb0791d3edc4f95a4ce6f23","index":34306},"timestamp":1634625398,"transactions":[{"metadata":{"description":"invoked: SP2C2YFP12AJZB4MABJBAJ55XECVS7E4PMMZ89YZR.arkadiko-freddie-v1-1::collateralize-and-mint(u300000000, u130000000, (tuple (auto-payoff true) (stack-pox true)), \"STX-A\", SP2C2YFP12AJZB4MABJBAJ55XECVS7E4PMMZ89YZR.arkadiko-stx-reserve-v1-1, SP2C2YFP12AJZB4MABJBAJ55XECVS7E4PMMZ89YZR.arkadiko-token, SP2C2YFP12AJZB4MABJBAJ55XECVS7E4PMMZ89YZR.arkadiko-collateral-types-v1-1, SP2C2YFP12AJZB4MABJBAJ55XECVS7E4PMMZ89YZR.arkadiko-oracle-v1-1)","execution_cost":{"read_count":155,"read_length":318312,"runtime":349859000,"write_count":10,"write_length":3621},"fee":188800,"kind":{"data":{"args":["u300000000","u130000000","(tuple (auto-payoff true) (stack-pox true))","\"STX-A\"","SP2C2YFP12AJZB4MABJBAJ55XECVS7E4PMMZ89YZR.arkadiko-stx-reserve-v1-1","SP2C2YFP12AJZB4MABJBAJ55XECVS7E4PMMZ89YZR.arkadiko-token","SP2C2YFP12AJZB4MABJBAJ55XECVS7E4PMMZ89YZR.arkadiko-collateral-types-v1-1","SP2C2YFP12AJZB4MABJBAJ55XECVS7E4PMMZ89YZR.arkadiko-oracle-v1-1"],"contract_identifier":"SP2C2YFP12AJZB4MABJBAJ55XECVS7E4PMMZ89YZR.arkadiko-freddie-v1-1","method":"collateralize-and-mint"},"type":"ContractCall"},"nonce":15,"position":{"index":16},"proof":null,...
Now, use the following command to scan the blocks based on the predicates defined in the print_event_1.json file.
chainhook predicates scan print_event_1.json --testnet
The output of the above command will be a text file arkadiko.txt generated based on the predicate definition.
[!TIP] To optimize your experience with scanning, the following are a few knobs you can play with: Use of adequate values for
start_blockandend_blockin predicates will drastically improve the performance. Networking: reducing the number of network hops between the chainhook and the bitcoind processes can also help.
The sample output file, arkadiko.txt, looks like this:
{"apply":[{"block_identifier":{"hash":"0xf048102fee15dda049e6781c8e9aec1b39b1b9dc68d06fd9b84dced1b80ddd62","index":34307},"metadata":{"bitcoin_anchor_block_identifier":{"hash":"0x000000000000000000098e9ebc30e7c8e32b30ffecbd7dc5c715b5f07e1de25c","index":705648},"confirm_microblock_identifier":{"hash":"0xa65642590e98f54183a0be747a1c01e41d3ba211f6599eff2574d78ed2578468","index":2},"pox_cycle_index":18,"pox_cycle_length":2100,"pox_cycle_position":1797,"stacks_block_hash":"0x77a1aed86e895cb4b7b969986aa6a28eb2465e7227f351dd4e23d28448b222e9"},"parent_block_identifier":{"hash":"0x3117663ee5c5690d76e3f6c97597cbcc95085e7cecb0791d3edc4f95a4ce6f23","index":34306},"timestamp":1634625398,"transactions":[{"metadata":{"description":"invoked: SP2C2YFP12AJZB4MABJBAJ55XECVS7E4PMMZ89YZR.arkadiko-freddie-v1-1::collateralize-and-mint(u300000000, u130000000, (tuple (auto-payoff true) (stack-pox true)), \"STX-A\", SP2C2YFP12AJZB4MABJBAJ55XECVS7E4PMMZ89YZR.arkadiko-stx-reserve-v1-1, SP2C2YFP12AJZB4MABJBAJ55XECVS7E4PMMZ89YZR.arkadiko-token, SP2C2YFP12AJZB4MABJBAJ55XECVS7E4PMMZ89YZR.arkadiko-collateral-types-v1-1, SP2C2YFP12AJZB4MABJBAJ55XECVS7E4PMMZ89YZR.arkadiko-oracle-v1-1)","execution_cost":{"read_count":155,"read_length":318312,"runtime":349859000,"write_count":10,"write_length":3621},"fee":188800,"kind":{"data":{"args":["u300000000","u130000000","(tuple (auto-payoff true) (stack-pox true))","\"STX-A\"",.........
Example 2
Run the following command to generate a sample JSON file with predicates in your terminal.
chainhook predicates new print_event_2.json --stacks
A JSON file print_event_2.json is generated.
{
  "chain": "stacks",
  "uuid": "1",
  "name": "Lorem ipsum",
  "version": 1,
  "networks": {
    "testnet": {
        "if_this": {
            "scope": "print_event_2",
            "contract_identifier": "ST1PQHQKV0RJXZFY1DGX8MNSNYVE3VGZJSRTPGZGM.monkey-sip09",
            "contains": "vault"
        },
        "then_that": {
            "http_post": {
            "url": "http://localhost:3000/api/v1/vaults",
            "authorization_header": "Bearer cn389ncoiwuencr"
            }
        },
        "start_block": 10200,
        "expire_after_occurrence": 5,
    }
  }
}
[!Note] The
start_blockis the required field to use thehttp_postthen-thatpredicate.
Now, use the following command to scan the blocks based on the predicates defined in the print_event_2.json file.
chainhook predicates scan print_event_2.json --testnet
The above command posts events to the URL http://localhost:3000/api/v1/vaults mentioned in the Chainhook.toml file.
Initiate Chainhook Service
In this section, you'll learn how to initiate the chainhook service using the following two ways and use the REST API call to post the events onto a server.
Initiate the chainhook service by passing the predicate path to the command as shown below.
chainhook service start --predicate-path=print_event_1.json --config-path=Chainhook.tomlThe above command registers the predicates based on the predicate definition in the
print_event_1.jsonfile.You can also dynamically register predicates via the predicate registration server. To do this:
- Uncomment the following lines of code in the
Chainhook.tomlfile to enable the predicate registration server.[http_api]
http_port = 20456
database_uri = "redis://localhost:6379/" - Start the Chainhook service by running
chainhook service start --config-path=Chainhook.toml. - Now, the predicate registration server is running at
localhost:20456. To dynamically register a new predicate, send a POST request tolocalhost:20456/v1/chainhookswith the new predicate, in JSON format, included in the request body. For complete documentation on the API endpoints available, see the OpenAPI specification. 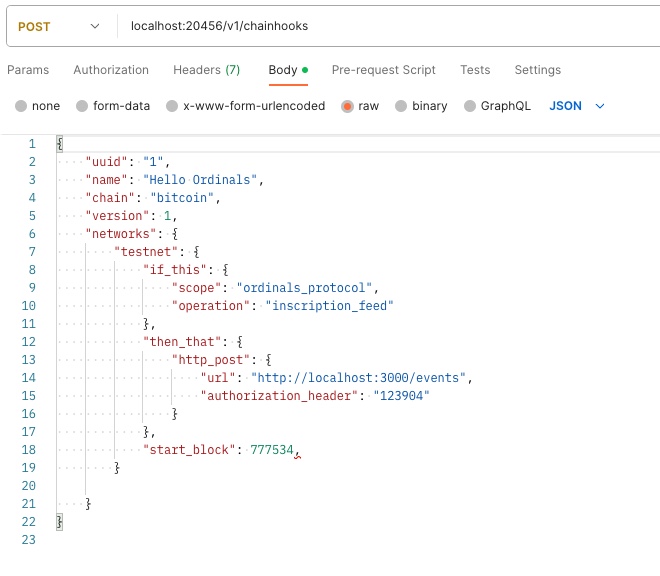
- Uncomment the following lines of code in the
[!TIP] You can also run chainhook service by passing multiple predicates. Example:
chainhook service start --predicate-path=predicate_1.json --predicate-path=predicate_2.json --config-path=Chainhook.toml